
R1soft Backups
Backups are important. That’s why at EZP we use R1soft’s excellent backup software on our shared hosting servers. Plus we recommend it to all of our VPS & Dedicated server clients.
As a shared hosting client, your site is automatically backed up. You do not have to configure anything for this to happen.
If you are a managed VPS/Dedicated client and you have ordered R1soft backups, we will configure backups for you. Our typical backup retention schedule is 7 nightly & 3 weekly backups, providing you with 10 total backup restore points. If you wish to have a different backup schedule, simply ask! We’re flexible.
If you are an unmanaged VPS/Dedicated client and you’ve ordered R1soft backups, we will provide you a login to the Server Backup Manager and you will be able to set your own backup schedules.
Using R1soft is fairly straight forward. However, we thought we should put together a quick guide on what R1soft backup software is capable of and how to use it.
What can R1soft do?
A lot… here is a quick list:
- Near Continuous Data Protection – you can easily schedule backups to run every 15 minutes if you wished.
- Block level backups – this has tremendous advantages over file level backups. But to keep things short, we’ll just state that it is faster and uses less storage.
- Flexible backup schedules – you can create the backup policy that fits your business needs.
- End to end encryption – your data is securely encrypted with AES-256 Encryption.
- Consistent MySQL backups – that’s right, MySQL backups made easy.
- Easy restores – through a simple web interface you can restore your files. Even to an alternate location so you can compare your backups to your live data.
- Portable backups – you can download your backups and store them wherever you want.
And a bunch more actually, but for our users these are probably the most relevant features. Please note that shared hosting clients do not have any control over the backup schedules but our VPS & Dedicated server clients do.
How do I use R1soft?
If you are a shared hosting client, or you have a VPS/Dedicated server with cPanel installed, first you’ll need to login to cPanel.
Once logged in, look for this icon and click it:

This will automatically redirect you to the R1soft control panel.
If you do not have cPanel, you’ll simply need to go to the url of your backup server and login with the username and password you were provided. If you’ve lost those, just submit a support ticket and we’ll be happy to help you out.
Once logged in, you’ll see a list of all the “recovery points” for your account. A recovery point is simply a backup available to you.
The page will look like this:
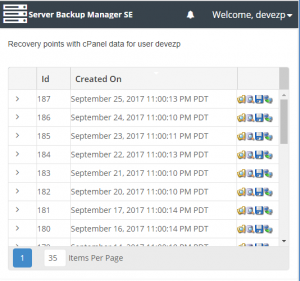
This screen has a LOT of options available to you. There are 4 icons here on the right of each recovery point. These icons are how you manage your backups. They are:
- Browse – this is how you manage you file backups.
- Browse Databases – this is how you manage your database backups.
- Download – this allows you to download your entire backup recovery point.
- Send to agent – we don’t really recommend this feature as it will just place a copy of your backup in your hosting account.
Managing File Backups
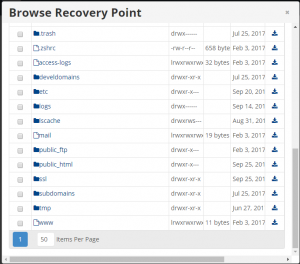
First, let’s review the “Browse” icon. As you’ve probably guessed, this allows you to browse the backup recovery point. If you click this, you’ll see a screen with your directory that was backed up.
If you want to restore all the files for your account, simply select the checkbox next to the home directory. Once you do that, you can then click the “Restore Selected” button. This will push all the files in the home directory backup to your account, overwriting the matching files currently there. This will not delete files that do not exist in the backup.

Like browsing through your file explorer in windows, you can also double click on each directory to traverse down them. To move back up a directory, click the “UP” icon in the top left of the screen. If you click the icon on the far right, you can also download the directory or file to your workstation – quite handy!
Managing Databases
The second icon allows you to browse the databases R1soft has backed up for that recovery point.
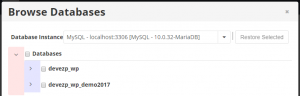
Once you click this icon, you can then restore any or all of the backed up databases simply by selecting it and clicking “Restore Selected” in the top right of the screen. Once you do that, you’ll see a screen giving you a summary of the restore process:

Downloading Backups
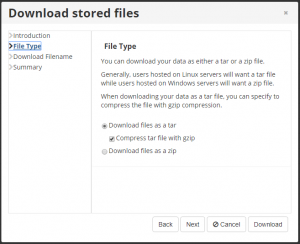
The third icon allows you to download the recovery point. This is exactly like downloading files we discussed above, but it is the entire backup at once. You have the option to choose what format you want to download it in – tar and gzip or simply zip.
And that about does it! If you want to learn more about R1soft, simply visit their site: www.r1soft.com or their wiki.