
DIY Hacked Website Cleanup
Ok, here is the long awaited follow up to our last blog post, So your website was hacked. We weren’t lying when we said cleaning up hacked websites was a big endeavour. Heck, it was a big endeavour just writing about it! But here it is, our DIY Hacked Website Cleanup article.
TL;DR: Cleaning up a hacked website is not very fun and a lot of work. If you’re an EZP client, we can help you with this – we sell hack cleanup services. If that’s not a good fit for you, we’ve written a pretty in depth post on cleaning your site.
Let’s dive right in…
Step 1: BACKUP
The first step in any hacked website clean up is to take a backup of your site. While there are several ways to go about this, if you are using cPanel simply generate a full backup to your homedir. We’ve written a KB article on using the cPanel backup system.
You may have R1soft backups, if so you can read our KB article on R1soft backups.
Of course there are other ways as well – WordPress plugins, manually tar’ing the account up, etc. However you choose to attack it, we just want you to backup your site before doing anything else.
Step 2: LOCKDOWN YOUR SITE
While your hacked website is backing up, you’ll want to lockdown your site. This will prevent any further damage from being done.
We prefer to do this via htaccess. Simply rename the .htaccess file in your current webroot directory (/home/user/public_html/.htaccess for cPanel users) to something like htaccess.bak and then create a new .htaccess file containing the following:
—
Order deny,allow
deny from all
Allow from xxx.xxx.xxx.xxx
—
Replace the xxx.xxx.xxx.xxx with your own IP address. If you don’t know your IP, just Google it.
What this little bit of text in your .htaccess does is block EVERYONE but your IP from accessing your site. So no more bots or hackers abusing your site further.
Next you’ll want to login to your cPanel account and change your cPanel password. Changing the cPanel password will change your SSH/FTP password. If you are not using cPanel, ensure you change your SSH/FTP passwords.
These last two steps are to try and prevent any further abuse of your site occurring while you are trying to clean it up. There is nothing more frustrating than having new hacks pop up on you when you are trying to fix things! Trust us, we’ve definitely been there.
Step 3: Locate hacked files
Now it’s time to determine the extent of the damage done to your site. Most of this will be done via command line, logged in via SSH. I also fire up a text editor to copy/paste useful information in – you may enjoy scrolling up to find info in your terminal or perhaps you have a photographic memory and can skip this tip. Whatever works for you.
If you are on a VPS/Dedicated server, you’ll want to run a couple of simple checks to see if there are any extra processes running on the server. Sadly it really helps to know what SHOULD be running here so that you can tell when things are out of place.
We like to run the following two commands:
pstree
ps faxu
Then we look for processes that stand out – for example a “perl” process or an additional “httpd” process (there should be the primary httpd process of course, but often you’ll see an extra one floating around when a hack has occurred). Here are two examples for you:

Note that second “httpd” process there?

Or that “cJmis7km8” process? Definitely not normal!
If you do find any suspicious processes running, you’ll want to check out the working directory of the process and see if it is running in a subdirectory of your site or in /tmp or /dev/shm, etc. You do this by grabbing the process ID in the second column of the “ps faxu” output:

And then run the command “ls -al /proc/<PID>”.
This will give you something like the following picture:
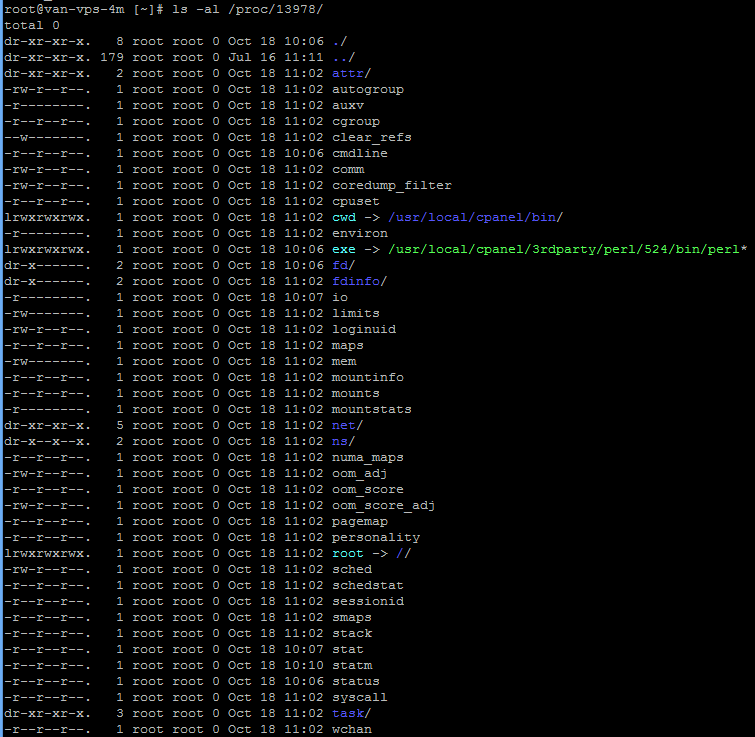
This is not a suspicious process, I just used it for demo purposes. But you can find the working directory of the process by looking at the line:
lrwxrwxrwx. 1 root root 0 Oct 18 11:02 cwd -> /usr/local/cpanel/bin/
If this was a suspicious process, I’d copy/paste the output to my notes as the time stamps here could be useful in tracking things down later.
Once you have collected the information of any suspicious processes running, you can shut them down using something simple from the command line, like:
kill -9 <PID>
You can also use commands such as “netstat -lnp” or “ss -lnp” to check for listening ports but this is usually not a big issue because most ports are firewalled (you DO have a firewall setup, right?!).
As we progress into our investigation, we need to examine the website files themselves now. Here you really need to know what should be in place. Quite often you can simply SEE something is not right in the DocumentRoot. A quick “ls -lac” command will help to show you any recently modified files.
For example:
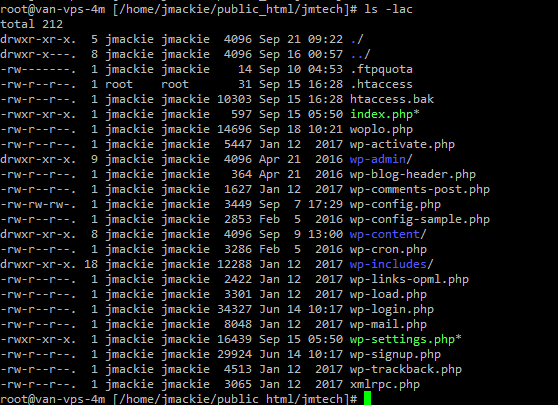
If you are familiar with WordPress, you’ll note right away that the woplo.php file is NOT a standard wordpress file. You’ll also see that it has a recently modified date (at the time of this investigation it was september 19th, the hack was discovered september 18th).
Another issue that should stand out is that the wp-settings.php file has the execute bit set when it typically does not.
Of course if you update your site frequently or if the site has been hacked for a long time, the file modification timestamps don’t help much. But often, they are quite obvious.
In this example, the woplo.php file contains the following:
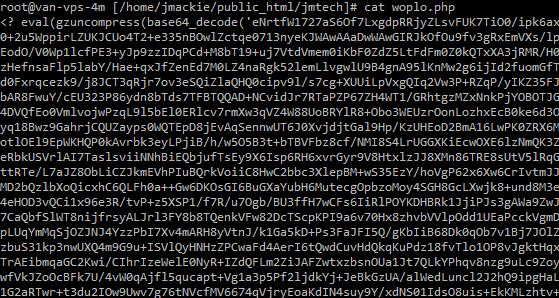
Now, this SCREAMS hacker right here with the use of “eval” & “base64_encode”. It’s like these guys were barely even trying.
That odd wp-settings.php file also contains a code injection that looks like:
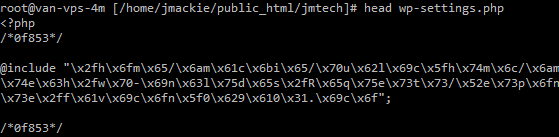
These typically decode down to something trying to include code from a remote site. Which is a strong argument for disabling php remote includes. In this case however, the hack is actually attempting to include another file from our own site:
/home/jmackie/public_html/jmtech/wp-includes/Requests/Response/favicon_0b9a01.ico
Which is interesting and something to note for investigation later.
By now we can clearly see that files have both been uploaded to the account and existing files modified. The damage is pretty clear. Now as our hack occurred quite recently and this site has not been updated recently, we’ll do a quick check of recently modified files on the account.
The command we like to use is:
find -ctime -7
Which will give us a list of all files modified in the past 7 days. Add this output to your notepad for inspection.
We’ll typically also run a virus scan on the account to help us find any further suspicious files. We run clamscan, so our command is:
clamscan -ir . -l ~/scanlog.txt
This will run a scan on the current directory and everything underneath it. Infected files will be listed on the screen and a log of the entire scan will be saved to the scanlog.txt file in your home directory.
If you are on a cPanel server, we’d recommend running this scan in the “public_html” directory and not your user home directory, as it will scan through all of your mail stored and likely flash a lot of false positives due to spam and such in your email. Plus it will also take forever and a day to finish the scan due to the nature of stored email – millions of small files.
When reviewing this list of recently modified and suspect files, you are primarily concerned with your data areas. With WordPress this means the wp-content directory and in particular the uploads directory underneath it should get reviewed with an extremely fine toothed comb.
With any of these files you should jump to the directory of the file and look for other files with the same or similar timestamp (found again with the handy “ls -lac” command) and investigate them as well. The virus scanner will only find hacks & exploits that it knows about so it is not foolproof.
Step 4: LOOK THROUGH LOGS TO FIND THE SOURCE OF THE HACK
Now you have a list of hacked files you think were modified and their associated ctimes, right?
What you’ll want to do is search through your weblogs to hopefully discover the source of the problem. We’re going to walk you through doing this via ssh, but there’s no real reason you couldn’t just download the log file to your pc, decompress it and use your favourite text editor… ssh is just more efficient.
On a cPanel account, you can find the archived web logs in:
home/username/logs
The logs are gzipped, but reading them is simple. With the trusty zcat command, a little bash pipe to push the output of the zcat command to the utility “less” you’ll be able to maneuver around these logfiles like a pro in no time. You’ll want to run the following command:
zcat jmtech.ca-Sep-2017.gz | less
Obviously changing the logfile name in our example here to match your logfile. Now you have a list of logfile entries on your screen. There are really only 3 things we need to know about using the less utility for this – “/” will search for the specified pattern from the top to the bottom of the file, “?” will search for the specified pattern from the bottom to the top of the file and if you want to exit the tool you can simply press “q” to quit.
We want to investigate how this file got infected on the site:
-rwxr-xr-x. 1 jmackie jmackie 16439 Sep 15 05:50 wp-settings.php
You should notice right away that the timestamp format of the “ls -lac” command is different than the timestamp in the weblogs. It is not difficult to modify the “ls -lac” timestamp to match the logfile. Now, you can search for that time stamp by simply pressing the “/” key and then pasting in the modified timestamp, like so:
/15/Sep/2017:05:50
Once you hit enter, you’ll see all the matching text strings will be highlighted. Like so:
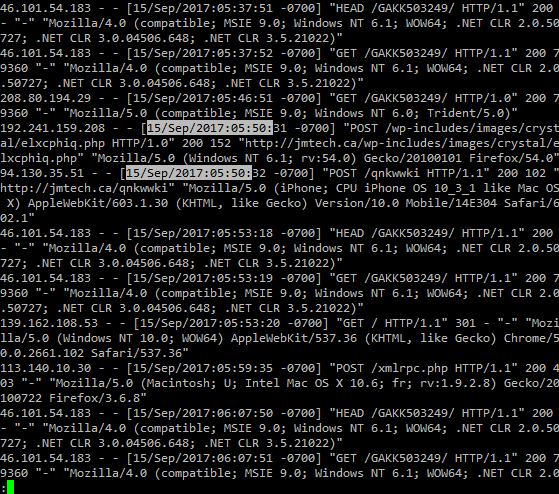
Now we can see what was going with the site around the time that the wp-settings.php file was changed.
Unfortunately, there is a lot of bad stuff going on in these logs. Let the wild goose chase begin! One file access will lead you to another file, which will lead you to another file until you hopefully find the source of the problem.
With this search, we’ll start with the following log entry:
192.241.159.208 - - [15/Sep/2017:05:50:31 -0700] "POST /wp-includes/images/crystal/elxcphiq.php HTTP/1.0" 200 152 "http://jmtech.ca/wp-includes/images/crystal/elxcphiq.php" "Mozilla/5.0 (Windows NT 6.1; rv:54.0) Gecko/20100101 Firefox/54.0"
Why this one? First, it’s a POST request which means data was sent to the server instead of pulling data from the server as typical web surfing activity would generate. Second, it’s method is http 1.0 and NOT 1.1 – which means it was likely a script making the connection to the webserver and not a modern web browser.
So let’s check out that directory:

A new timestamp, so now we get to go back to the logs and find out how that file managed to get on our site. Again, use your handy zcat & less skills to produce this:

You can see there is ANOTHER file called wp-asyncio.php to investigate. You should repeat this process until you come to the beginning. At this point, you’ll have identified the source of the hack due to the plugin or theme directory the first hacked file appeared in.
But maybe you can’t find the source of the hack. Perhaps the hacker files just seemed to materialize into your account? One sneaky tactic we have seen is our users workstations becoming infected with malware that scrapes login information from config files from your favourite ftp client (such as filezilla for example). Or the malware is a keylogger, a network connection scraper, etc… In any event the ftp login details get stolen and the hackers simply login to your account via FTP and upload their toolkit.
You should also see an FTP logfile in the same place as your weblogs were stored – in “home/username/logs”. You can use the same technique to open that file and look around as we used with the weblogs.
If you do find ANYTHING suspicious in the FTP logfile, stop everything and go to malwarebytes.org. Download and run the software and hopefully find the malware on your workstation.
Step 5: CLEANUP THE SITE
So we are done investigating the hack. Up until this point, the steps are the same regardless of the software you are running for your website. However the rest of this article will be based on a WordPress site. The basic principles are the same and can be adapted to any other software though.
Now you have to make a decision – do you attempt to restore from backups, cleanup the current site or just start over?
Restore from backup.
Restoring from backups is a great solution if you have a CLEAN backup of the site prior to the hack. This is generally the fastest option to get your site back online. The caveat is that the site was hacked, thus there is SOMETHING on the site that is vulnerable to exploit. This vulnerability quite likely exists in your backups! If you were not able to determine exactly what the root cause was, well then; you are going to be hacked again if you do nothing. So once you restore from your backup, please ensure that you run ALL updates available immediately after you’ve restored the site.
There are two parts to restoring from backups – the website files and the database. Often the website files are the only infected ones. However, once in awhile you will find spammed links and such injected into the database. So it’s probably prudent to restore both the website files and the database. Before you go and restore your backups into your account, you’ll want to keep the following paragraph in mind.
With your website files, you don’t want to just upload your clean backups over the existing files in the account. Doing this will not REMOVE the additional files that the hackers uploaded, only overwrite the files the backup contains. You’ll want to move all the files out of the way first, restore your clean files from backup and then once you are completely satisfied that you no longer require the old hacked files you can delete them.
Assuming your website document root is “/home/user/public_html” (the most common cPanel setup) and that you are sitting in the “/home/user/” directory, you can run a few quick shell commands to accomplish this:
ls -la
To show permissions on the public_html directory,
mv public_html public_html.bak
This moves the document root to a new non web viewable directory,
mkdir public_html
This recreates the document root,
chmod 750 public_html
This is the most common permissions on the document root, but refer back to your “ls -la” output above for this step. Need a refresher on linux file permissions?
That last command is really important! If you have the wrong permissions on your document root when you try to access your site you’ll hit some very frustrating 403 errors! (If you are working as root, you’ll need to change ownership of the directory as well but if you have root you probably don’t need us to tell you that!)
Now you have a blank document root to work in. Using (s)ftp go ahead and upload your clean files from your backup – or upload your archive and extract the clean files in place. Whatever you are comfortable with.
So now we know the document root has clean files. Next we need to work on that database.
First, let’s backup the current database. You can use phpmyadmin to generate a dump or you can use the following command line:
mysqldump -u <user> -p <password> <databasename> > <filename>.sql
You’ll replace anything in <> with your actual info, so <user> would become jmackie for instance. Perhaps an example will clarify things:
mysqldump -u jmackie -p Ar3allYAw3s0mep4ssw0rd jmackie_wp > jmackie_wp091817.sql
At which point the “jmackie_wp091817.sql” file should appear in your working directory. That is your database backup. I like appending the date to backups, just makes keeping track of things easier.
At this point we’ll want to remove the current database and import your clean backup. Unless you are 100% certain your .sql file contains a drop table/drop database command, in which case you can skip this step.
You can do this via cPanel or you can do it from the command line. We like command line so we’ll give you an example:
mysql -u <user> -p
Once again, replace <user> with your username. When you hit enter, you be prompted to enter your password. When you’ve successfully logged in, you’ll see a prompt like:
mysql>
At which point you’ll want to run:
mysql> drop database if exists jmackie_wp;
Now that you have deleted the old database, you can import the new one by exiting mysql and running something like:
cat jmackie_wp091117.sql | mysql jmackie_wp
If you decide against deleting and restoring your database, you may run into an issue – you have images and such missing! You can carefully access the public_html.bak directory, go into the WordPress uploads directory and CAREFULLY move over any missing files you need to the clean site. You may even want to login to WordPress to check the media manager and find the missing images. Of course, the most important thing to do here is not to move over any infected files!
So you are done restoring from backups now. However, you are not finished so scroll down to the final steps section please!
Cleanup the site.
Cleaning up the site is usually fairly simple. However, if you miss even a single file that the hackers have hidden around the site, you are still vulnerable to a re-infection. So you need to go through every file to ensure they are clean. As every hack is different, it is very difficult to give a thorough walk through on how to clean up, but HEY let’s give it a shot!
There are basically two methods to cleaning the site. Our preference would be the first.
Preferred Method.
Follow the directions for restoring from backups to move the public_html directory to public_html.bak and recreate a clean public_html directory to work in. However, instead of restoring your backups, go to WordPress release archive and download a clean copy of your version of WordPress – you can find your version of WordPress by looking at the “wp-includes/version.php” file on your hacked site.
Put those fresh wordpress files in your clean public_html directory. If you don’t want to download the files to your workstation and then upload them to your public_html directory, you can do it via commandline of course:
cd ~; wget https://wordpress.org/wordpress-4.8.1.tar.gz
Replace the url with whatever WordPress version you need. This command will download the archived WordPress files and put them in your user’s home directory. Next, you want to run:
tar xfvz wordpress-4.8.1.tar.gz --strip-components=1 -C public_html
WordPress likes to put its files in a WordPress directory by default, which can be a bit annoying. The above command will prevent that from occurring and instead put the files in the public_html directory where we want them.
So now you have a clean working directory with a clean WordPress install in it. You’ll need to copy over some relevant files from the hacked website. The primary files you’ll need are the “wp-config.php” file, the “.htaccess” files and the “wp-content” directory.
The “wp-config.php” and “.htaccess” files are pretty easy – you can quickly take a peek at them and see if there is anything malicious in those. If so, strip out the malicious bits. Then, simply copy them over:
cp public_html.bak/.htaccess* public_html.bak/wp-config.php public_html/
If the “wp-config.php” is badly messed up, feel free to skip copying it over and simply generate it new just using the data from the hacked file as a reference.
Now, the “wp-content” directory in WordPress is important because it is where all user added content is stored – think themes, plugins, media, etc. You may be tempted to simply copy over the directory en-masse but there is a GOOD chance you’ll copy over malicious code and you’ll get hacked again. Obviously, we don’t recommend this.
What we DO recommend is going and finding a fresh copy of every plugin & theme you’ve used for your site. Download them all to your site so you know they are uninfected. Only copy files out of the “wp-content” directory that are otherwise irreplaceable (you really should have had backups!).
Of course, you don’t have backups and that is why you are reading this. So, you’ll need to focus your attention on the “wp-content/uploads” directory next. Do NOT just blindly copy this directory over – hackers LOVE to hide PHP files with nasty code in them here. You’ll want to thoroughly investigate, but a handy tip to find PHP files for manual review is:
find public_html/wp-content/uploads/ -name *.php
Any php files that you discover in the year/month folder are very suspect and likely a hacker file. All the other php files you find you’ll want to do your research and ensure they are clean. If in doubt, don’t copy them over – let the plugins recreate them.
At this point you should login to the admin area to see if any of your posts and such have spam in them. If so, you’ll need to remove it.
You may find the wp-migrate-db plugin to be quite helpful as it can run a ‘search and replace’ on the live database. Which is great for when the hackers have spammed a link into all your posts.
Cleaning files in place.
The other method is try and actually clean the site files in place. If you use a version control tool like GIT, it can make your life much easier. You can also download a clean copy of your version of WordPress from the release archive and do a diff on the files to see if any of the core files were modified. You’ll need to comb through a lot of output and investigate plenty of stuff here. Plus, you’ll need to download your theme, plugins, etc. to run a diff on those… you may as well just go with our recommended route above.
Final steps.
By now, you should have a fully functional and unhacked website.
The final steps here, whether you restored from backups or cleaned your site; are the following:
- Login to your WordPress admin and apply any updates ASAP!
- Investigate your WordPress users to ensure the hackers did not slip in any new admins users or update any existing admin users email address, etc.
- Finally, remove any extra files/working directories. The backup you made should be downloaded to your workstation (because when you have a few minutes free time you may find it fun
to look at what the hackers have done!) and removed from your website. Plus you’ll want to remove the public_html.bak file, download and remove the sql file you made, etc.
Oh! Nearly forgot about starting over from scratch – it is the only real guaranteed way to ensure you have a 100% clean website. Of course, it also takes the most time and you don’t need a walk through from us on how to build a new website as you’ve already done this once or you couldn’t have a hacked site!
IMPROVE SECURITY TO PREVENT MORE HACKS
Ok, so now your site is “fixed”. You’ll probably want to ensure it stays that way, unless you’re the type of person who enjoys doing plenty of work for no gain. Plus, no one likes getting an email from their hosting company because their website is spamming or is hosting phishing pages, etc.
So here is the big spammy shameless EZP plug:
Buy Sucuri’s WAF (Web Application Firewall) protection for your site. That’s right, we sell Sucuri’s stuff because they rock. Excellent protection for your website along with a few bonuses such as a CDN to speed up your website delivery. Login to our client area and buy it. Or send us an email and we’ll give you more info about it.
We’ll also put out another article in a few days with a few WordPress specific tips to help keep your website secure.
But for now, this post is long enough! We hope you found something useful here. We’re amazed that you actually made it all the way through this!