
How to use SSH Keys
What is SSH, and why should you use keys?
SSH is the magical low level tool that really gives you full control over your hosting account. You can get on the server, and really SEE whats going on. Any dedicated server, or VPS client should know how to use this tool, and the basic management commands on the server at least to monitor and detect problems. The downside to this ‘power’ is its ability to be abused. Passwords are usually kept way too simple, because you need to remember them. Unfortunately when it comes to a 24/7 internet connected server that’s a pretty ‘not cool’ thing to do. Baddies are on the prowl and looking for weak passwords, trying to get into your server 100’s of times per minute. 24/7. 365. (That’s all the time folks!). There are multiple things that can be done to mitigate this fact of life. ONE of those is just outright NOT using passwords.
This is accomplished by using KEYS. These are stored in a file. So you don’t need to remember them and they are nice and long, so are very difficult to bruteforce. (Nothing is impossible). The key file itself can be protected with a password. But since you keep that file on your computer, its not on the server, and less likely to be compromised, and if it is, you’ll probably have time to change it on the server before the hackers can bruteforce your passphrase.
This may sound like it gets complicated but it’s really a simple process. You tell your system to use your private key to connect to the server, which has been configured to accept it by placing the public key in the ‘authorized_keys’ file. So when you connect, ssh sends the key, the server accepts it, and gives you a terminal. Easy peasy! (The actual process is a bit more involved and the KEY isn’t JUST a really long password but the actual mechanics of the authentication are not for this article)
Once that is done, you can disable ssh password logins to your server completely. Since you don’t need to remember it, you can set the password to something outrageously difficult to bruteforce, but not so crazy that its impossible to type in a reasonable amount of time. (If you need to connect to the console of the server.. there is no copy/paste.. and the login WILL timeout after a certain amount of time). A long passphrase.. a line from your favorite book, or song.. or saying.. can really go a long way here.. just think of a hacker trying to bruteforce a password like “it was a dark and stormy night late in the summer of 2016 when i decided to take the dog for a walk”. Sure it doesn’t meet a lot of ‘secure password criteria’ (don’t get me started on the stupidity of THAT trend), but really? Who’s going to hack that?
LETS DO THIS!
So while its all well and good to know the why. The implementation of ssh keys seems to throw a lot of people for a loop. So lets walk you through it!
First.. you need a key!
There are multiple ways to generate a key. On Mac and Linux you just need to load up a terminal window and type:
ssh-keygen
It will ask for a path/filename which you can accept the defaults.
When done you will find a .ssh directory and 2 files. id_rsa (the private key) and id_rsa.pub (the public key).

On windows it may depend a lot on what program you are using. My ssh program of choice is PuTTY So I will go through setting it up. It has its own key format ‘.ppk’ but luckily it comes with a program called PuTTYgen that allows you to generate the key.
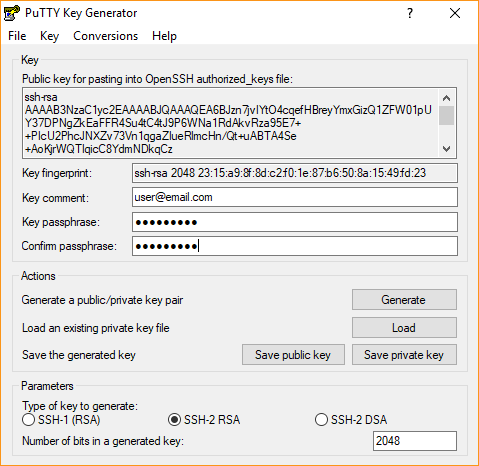
Load up puttygen and select RSA under the parameters. and then click the ‘generate’ button.
It will ask you to move the mouse around to generate randomness, and shortly thereafter you will have a key. You can put in a comment (I prefer my email address) and a passphrase. I highly recommend a passphrase but it’s not ‘required’. Save the key to a known location that you will reference later. Note on the top of this screen is a box that has the public key in the format that the server requires. You should copy this out and put it in a file. You can use notepad for this.
The private key should stay on your computer and the public key you will put on any remote server that you want to connect to using the private key.
so now that we have the files we need… we need to get the public key on the server. The fastest way to do this is to just login to the server, and create the required file and paste the public key into it. That’s done like so:
mkdir .ssh (if it doesn't exist)
vi .ssh/authorized_keys
press i for insert mode
paste your key in
[esc]:wq[enter] (get out of insert mode, enter command mode, write and quit.)

you can alternatively use ‘nano’ instead of vi which some people find more user friendly.
You could also create the file on your computer, and upload it using ftp. Or if the server you are connecting to is cpanel, you can use its built in key manager to add your key for you.
At this point unless you used cpanel, the permissions will most likely need to be changed on the files. The next command fixes it in one step:
chmod go-wrx .ssh -R

This removes the group and world privileges from the .ssh directory and all files under it. Ssh will refuse to allow the key to be used if it thinks the permissions are unsafe (and someone unauthorized could have added a new key to the authorized list)
once this is done you just need to tell your computer to use the new key when connecting to that server. ON mac/linux this is already done! it knows to try the id_rsa private key from the users .ssh directory by default.
windows is generally not that smart. you have 2 options. configure your program to use the key for the server, OR what I do. Use an ssh-agent. Putty comes with ‘pageant’. An ssh agent holds your keys for you and allows programs to use them for authentication automatically. The added BONUS, is that if you put a passphrase on your privatekey. You only need to enter it when loading it into the agent (usually once per reboot), instead of every time you want to connect to a server.
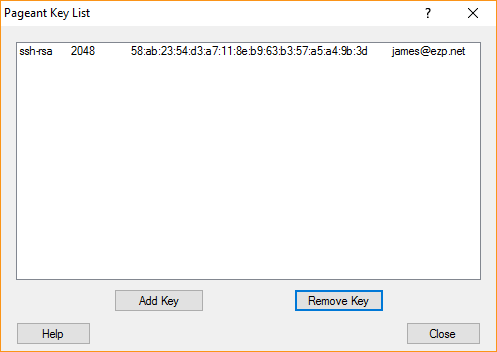
load up pageant, and select add key. browse to your private .ppk file and select it. Enter the passphrase if you had one. You should then be able to ‘view’ the keys with pageant and see your key:
On mac/linux you can get the same ‘benefits’ of one time passphrase entry by running ‘ssh-agent’. and then using ‘ssh-add’ to add the key to the agent. 🙂 On my linux/mac machines that I work from I add some lines to the ‘.bash_profile’ file to automatically start an agent when I login, and subsequently kill it when I logout. This allows me to only enter the passphrase in that terminal once for that session.
 SSHAGENT=/usr/bin/ssh-agent
 SSHAGENTARGS="-s"
 if [ -z "$SSH_AUTH_SOCK" -a -x "$SSHAGENT" ]; then
 eval `$SSHAGENT $SSHAGENTARGS`
 trap "kill $SSH_AGENT_PID" 0
 fi
So. At this point. Try connecting to the server. It should just let you in and bring you to a prompt. If not? 😐
TROUBLESHOOTING!
Check to make sure that the permissions are correct (you did remember to run the ‘chmod go-rwx .ssh -R’ right?)
A log entry like this means you didn’t do it:
Feb 14 17:04:45 jmtemp sshd[1252]: Authentication refused: bad ownership or modes for file /home/exampleuser/.ssh/authorized_keys
Make sure that the authorized_keys file is in the .ssh directory. (Do you want to know how many times I mkdir .ssh, vi authorized_keys, thus putting the authorized_keys file in the home directory instead of the .ssh directory? I’m not going to tell you because it’s embarrassing) , there is no log entry for this. It will just not accept the key and ask for password.
If the file is in the right place and the permissions are correct and are sure that you are telling your computer to use your key.
Once all that is double checked (no really, check!) SELinux can sometimes be a pain. If you see this in the audit.log:
type=USER_AUTH msg=audit(1455487911.150:80): user pid=1295 uid=0 auid=4294967295 ses=4294967295 subj=system_u:system_r:sshd_t:s0-s0:c0.c1023 msg='op=pubkey acct="exampleuser" exe="/usr/sbin/sshd" hostname=? addr=192.168.35.101 terminal=ssh res=failed'
The fix is running the following command:
restorecon -R -v ~$USER/.ssh
This tells selinux to put the correct ‘contexts’ on the .ssh directory that allows selinux to allow sshd to read the authorized_keys file.
If your keys are still not working at this point. Start over. You’ve done something wrong. 🙂
(during this tutorial at this point I found that I didn’t copy/paste the full key into the authorized_keys file. 😐 we all make mistakes..)
Additional Info
Once you have this working. The same setup can be used for sftp/scp (A secure alternative to ftp). If you are using an agent, it will pull your key from there, otherwise you just need to set the key in the connection settings and it will work the same way. Without saving your password to the server!
You can use the same key for all your ‘things’ OR use a different one for each. If you choose to use a different key for each service, you should set those keys manually and NOT put them into an agent. (SSH counts a key attempt as a login attempt. If you have 6 keys loaded, and the ssh server has ‘max login attempts’ set to 5, and the key
For VPS and Dedicated Servers you can now DISABLE password SSH logins. This is done by editing the file /etc/ssh/sshd_config
Change the following line as so:
# To disable tunneled clear text passwords, change to no here!
#PasswordAuthentication yes
#PermitEmptyPasswords no
PasswordAuthentication no
And restart sshd.
service sshd restart
Start enjoying the fact that you’ve incrementally increased the security of your account/server/vps/life. 🙂